Each software or product’s performance is a key component, and many things may affect it. The performance results are often adequate when building apps in Flutter, however, you could still experience issues with the performance of your app.
For this reason, it’s important to focus on best practices and performance enhancements for your Flutter app development services so that you can address any problems upfront and give your end users a faultless experience.
This article’s goal is to guide you through the specific best practices for enhancing the performance of Flutter apps. We’ll demonstrate flutterwave scandal how to:
Steps to improve the performance of the Flutter application
1. Avoid re-building widgets
The use of setState to recreate StatefulWidgets is one of the most prevalent performance anti-patterns. The scaffold, background widget, and container are all updated each time a user interacts with the widget, which dramatically lengthens the time it takes for the app to launch.
In this situation, the best course of action is to just rebuild the necessary updates. Using Flutter’s Bloc pattern, this is possible. Popular packages include flutter bloc, MobX, and Provider.
Yet, did you know that this may be done without using any additional packages? Let’s look at the example below:
class _CarsListingPageState extends State<CarsListingPage> {
final _carColorNotifier = ValueNotifier<CarColor>(Colors.red);
Random _random = new Random();
void _onPressed() {
int randomNumber = _random.nextInt(10);
_carColorNotifier.value =
Colors.primaries[randomNumber % Colors.primaries.lengths];
}
@override
void dispose() {
_carColorNotifier.dispose();
super.dispose();
}
@override
Widget build(BuildContext context) {
print(‘building `CarsListingPage`’);
return Scaffold(
floatingActionButton: FloatingActionButton(
onPressed: _onPressed,
child: Icon(Icons.colorize),
),
body: Stack(
children: [
Positioned.fill(
child: BackgroundWidget(),
),
Center(
child: ValueListenableBuilder(
valueListenable: _colorNotifier,
builder: (_, value, __) => Container(
height: 100,
width: 100,
color: value,
),
),
),
],
),
);
}
}
The behavior for potential actions based on the state, such as _onPressed, is described by the class _CarsListingPageState. The construct method of the framework creates a Widget instance depending on the context that is passed to the method. It makes a floatingActionButton object and defines its attributes, including color, height, and width.
OnPressed is called when the user clicks the FloatingActionButton on the screen, and it calls _onPressed from the _CarsListingPageState variable. The screen’s center is then filled with a random color chosen from the primary color palette and returned by the function Object() { [native code] }.
The build function in the code above fails to print the results of generating the CarsListingPage here every time. This indicates that the logic is sound and that the widget we require is being created.
2. Make use of constant widgets
What distinguishes a regular widget from a constant one? Applying const to the widget will initialize it at build time, as the specification indicates.
This indicates that initializing the widget as a constant will do so before compilation, rather than during runtime, along with initializing all of the widget’s dependencies. Also, by doing this, you’ll be able to employ widgets as much as possible without having to redesign your website.
An illustration of how to utilize a constant widget is shown below:
class _CarListingPageState extends State<CarListingPage> {
int _counter = 0;
void _onPressed() {
setState(() {
_counter++;
});
}
@override
Widget build(BuildContext context) {
return Scaffold(
floatingActionButton: FloatingActionButton(
onPressed: _onPressed,
child: Icon(Icons.play_arrow),
),
body: Stack(
children: [
Positioned.fill(
child: const DemoWidget(),
),
Center(
child: Text(
_counter.toString(),
)),
],
),
);
}
}
class DemoWidget extends StatelessWidget {
const DemoWidget();
@override
Widget build(BuildContext context) {
print(‘building `DemoWidget`’);
return Image.asset(
‘assets/images/logo.jpg’,
width: 250,
);
}
}
The _onPressed state, which activates setState and raises the value of _counter, is one that the _CarListingPageState class defines. A FloatingActionButton and other tree elements are created via the construct method. DemoWidget’s first line generates a new instance and defines it to be a constant.
The counter grows each time the FloatingActionButton is pressed, and its value is shown inside the child item on the screen. As DemoWidget is specified to be a constant widget throughout this run, the regeneration of the entire widget is skipped.
The phrase “creating DemoWidget” is printed only once when the widget is produced for the first time, as shown in the GIF below, and thereafter it is reused.
Unfortunately, the phrase “creating DemoWidget” will always be printed whenever you restart the flutter application or do a hot reload.
3. Load list items efficiently– and on-demand
Developers typically combine the widgets SingleChildScrollView and Column when dealing with list elements.
If you keep using the same collection of widgets while working with huge lists, things might become disorganized quite fast. This is due to the fact that each item is drawn on the screen after being added to the list, adding to the system’s total burden.
Use of the ListView function Object() { [native code] } is advised in these circumstances. Performance is greatly enhanced as a result. Let’s examine a builder object example:
ListView.builder(
itemCount: items.length,
itemBuilder: (context, index) {
return ListTile(
title: Text(‘Row: ${items[index]}’),
);},);
4. Make use of async/await
It’s crucial to consider whether the code may run synchronously or asynchronously when creating your execution flow. There are a number of techniques to write async code in Flutter, such as utilizing Future, async/await, and others. Async code is more challenging to debug and enhance.
The readability of the code increases when async is used together since the structure and pattern of creating code are adhered to. On the other hand, because it may entertain fail-safe techniques when necessary, in this example try… catch total execution performance increases. Let’s examine the image below:
// Inappropriate
Future<int> countCarsInParkingLot() {
return getTotalCars().then((cars) {
return cars?.length ?? 0;
}).catchError((e) {
log.error(e);
return 0;
});
}
// Appropriate
Future<int> countCarsInParkingLot() async { // use of async
try {
var cars = await getTotalCars();
return cars?.length ?? 0;
} catch (e) {
log.error(e);
return 0;
}
}
5. Efficiently use operators
There are several language-specific features in Flutter. Operators are one of them.
If you want to save development time, build strong code to avoid logical mistakes, and also increase the readability of the code, then null-check operators, nullable operators, and other suitable ones are advised.
Let’s examine a few instances below:
car = van == null ? bus : audi; // Old pattern
car = audi ?? bus; // New pattern
car = van == null ? null : audi.bus; // Old pattern
car = audi?.bus; // New pattern
(item as Car).name = ‘Mustang’; // Old pattern
if (item is Car) item.name = ‘Mustang’; // New pattern
6. Make use of interpolation techniques
The + operator is frequently used to perform string manipulations including chaining. Instead, we’ll utilize string interpolation, which makes your code easier to comprehend and decreases the likelihood of mistakes.
// Inappropriate
var discountText = ‘Hello, ‘ + name + ‘! You have won a brand new ‘ + brand.name + ‘voucher! Please enter your email to redeem. The offer expires within ‘ + timeRemaining.toString() ‘ minutes.’;
// Appropriate
var discountText = ‘Hello, $name! You have won a brand new ${brand.name} voucher! Please enter your email to redeem. The offer expires within ${timeRemaining} minutes.’;
As said, accessing variables inline makes defined text with values easier to understand and the code less prone to errors since the string is broken up into fewer pieces.
7. Reduce your app size
Adding several packages to your code while it is being developed is quite simple. This can develop into bloatware, as you are well aware.
As an example, consider an Android application. To decrease the size of the app, utilize Gradle, a potent open-source build tool that offers a wealth of configuration choices.
Also, you may create Android app bundles, a new Google packaging mechanism.
Bundles of apps are effective in a variety of ways. Through the Google Play Store, just the code required for a specific target device is downloaded. This is made feasible by the fact that the Google Play Store merely repacks and sends the files and resources required for the screen density, platform architecture, and supported hardware characteristics of the destination device.
According to Google Play Console statistics, choosing app bundles over APKs often results in a 40–60% reduction in the size of the app’s download.
The following command creates an app bundle:
flutter build appbundle
You must use obfuscate and the —split-debug-info parameter with the build command to obfuscate the Dart language code. The command appears as follows:
flutter build apk —obfuscate —split–debug–info=/<project-name>/<directory>
The command mentioned above creates a symbol mapping file. To de-obfuscate stack traces, use this file.
8. ProGuard and keep rules
The build.gradle file for an example program, with ProGuard and other options applied, is shown below:
android {
…
def proguard_list = [
“../buildsettings/proguard/proguard-flutter.pro”,
“../buildsettings/proguard/proguard-firebase.pro”,
“../buildsettings/proguard/proguard-google-play-services.pro”,
…
]
buildTypes {
release {
debuggable false // make app non-debuggable
crunchPngs true // shrink images
minifyEnabled true // obfuscate code and remove unused code
shrinkResources true // shrink and remove unused resources
useProguard true // apply proguard
proguard_list.each {
pro_guard -> proguardFile pro_guard
}
signingConfig signingConfigs.release
}
}
Applying ProGuard rules to your Android app is one of the greatest ways to reduce APK size. ProGuard employs rules that eliminate unnecessary code from the resulting package. The code mentioned above uses ProGuard from the provided location to apply various settings to code and resources throughout the build generation process.
An illustration of a ProGuard rule set for Firebase is provided below:
–keepattributes EnclosingMethod
–keepattributes InnerClasses
–dontwarn org.xmlpull.v1.**
–dontnote org.xmlpull.v1.**
–keep class org.xmlpull.** { *; }
–keepclassmembers class org.xmlpull.** { *; }
Keep rules are the statements mentioned above. A configuration file for ProGuard contains the maintenance rules. When the stated pattern of the maintain rule matches during the code shrinking and obfuscation phase, these rules specify what to do with the files, attributes, classes, member declarations, and other annotations.
You can specify what to keep and what to ignore using the dash and declaration rule keyword, like so:
-keep class org.xmlpull.** { *; }
When ProGuard is used, the aforementioned rule won’t delete the class or any of the class contents during the code shrinking phase.
Even so, you should exercise caution when utilizing it because mistakes might be made if it’s not done correctly. The reason for this is that if you define a rule that eliminates a code block, a class, or any members that are declared and utilized to execute the code, the rule may generate catastrophic problems like null pointer exceptions as well as compile-time and run-time issues.
The official Android developer community can teach you more about how to apply ProGuard rules correctly.
9. IPA building steps for iOS
The.IPA construction procedures are the same for iOS and are as follows:
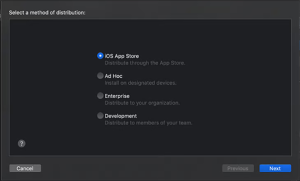
1. Go to XCode and choose to Distribute app from the Archives area in the right pane.
2. Clicking the Next button will take you to the App Thinning section after choosing the distribution mode, for instance, Development.
3. Make the selection of All supported device variations under the App Thinning section.
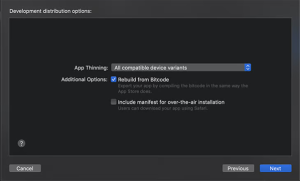
4. Then pick Remove Swift symbols and Rebuild from Bitcode. Then, export the.IPA file after signing it. Moreover, an app-thinning size report file will be produced.
Wrapping up
This article has covered the methods for enhancing the performance of Flutter-based apps. Performance is always a crucial factor, even if the Flutter framework is packed with features and is continuously changing with new versions.
The effectiveness of an app has been and will continue to be a key differentiator in gaining worldwide market share. Improving performance may make a significant impact when taking into account the many components of mobile app development, such as app size, device resolution, code execution speed, and hardware capabilities, especially when aiming to reach big audiences.
Author bio– Amara works with the editorial team of DianApps, a leading company offering the best website development company. Exploring the latest technologies, reading about them, and writing her views have always been her passion. She seeks new opportunities to express her opinions, explore technological advancements, and document the details. You can always find her enjoying books or articles about varied topics or jotting down her ideas in a notebook.